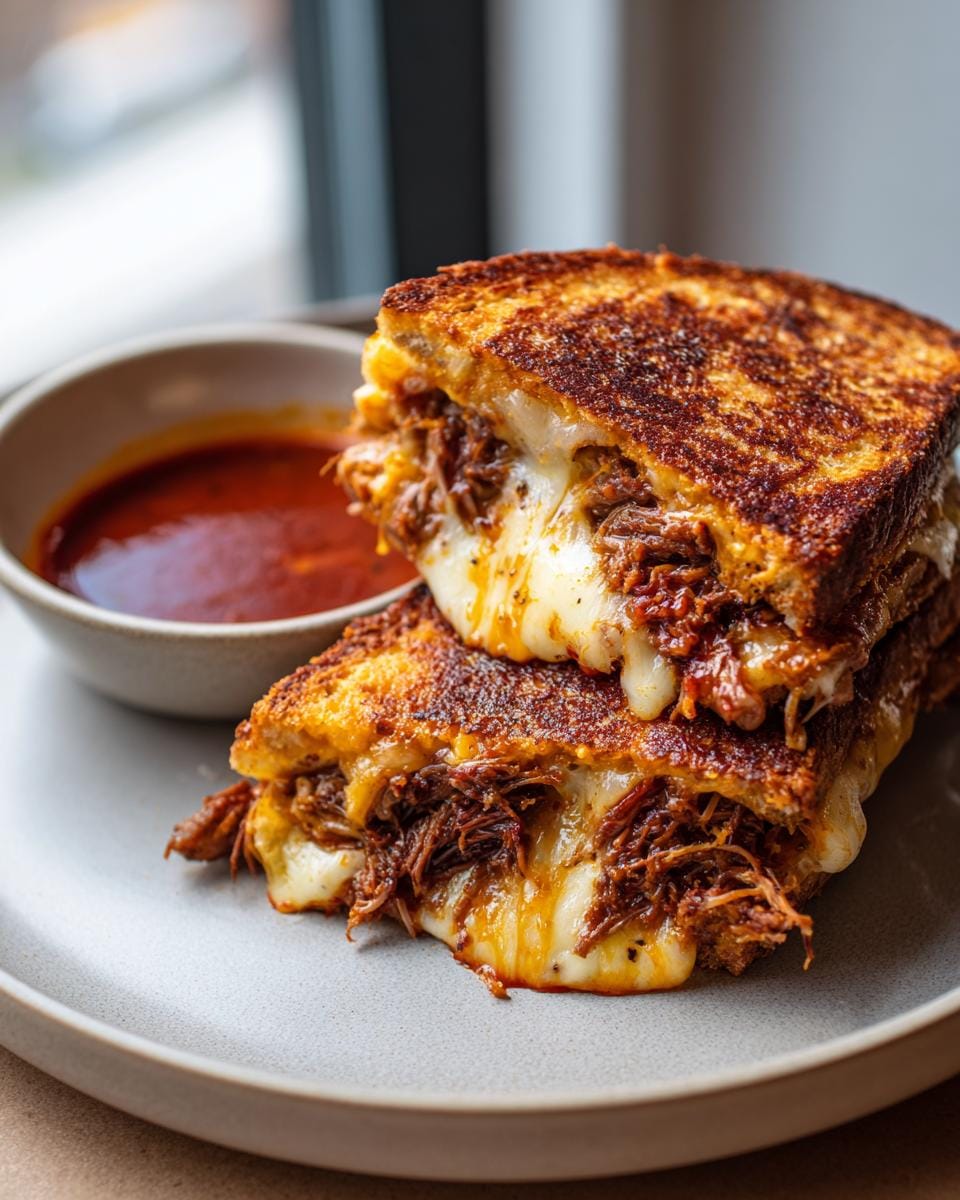
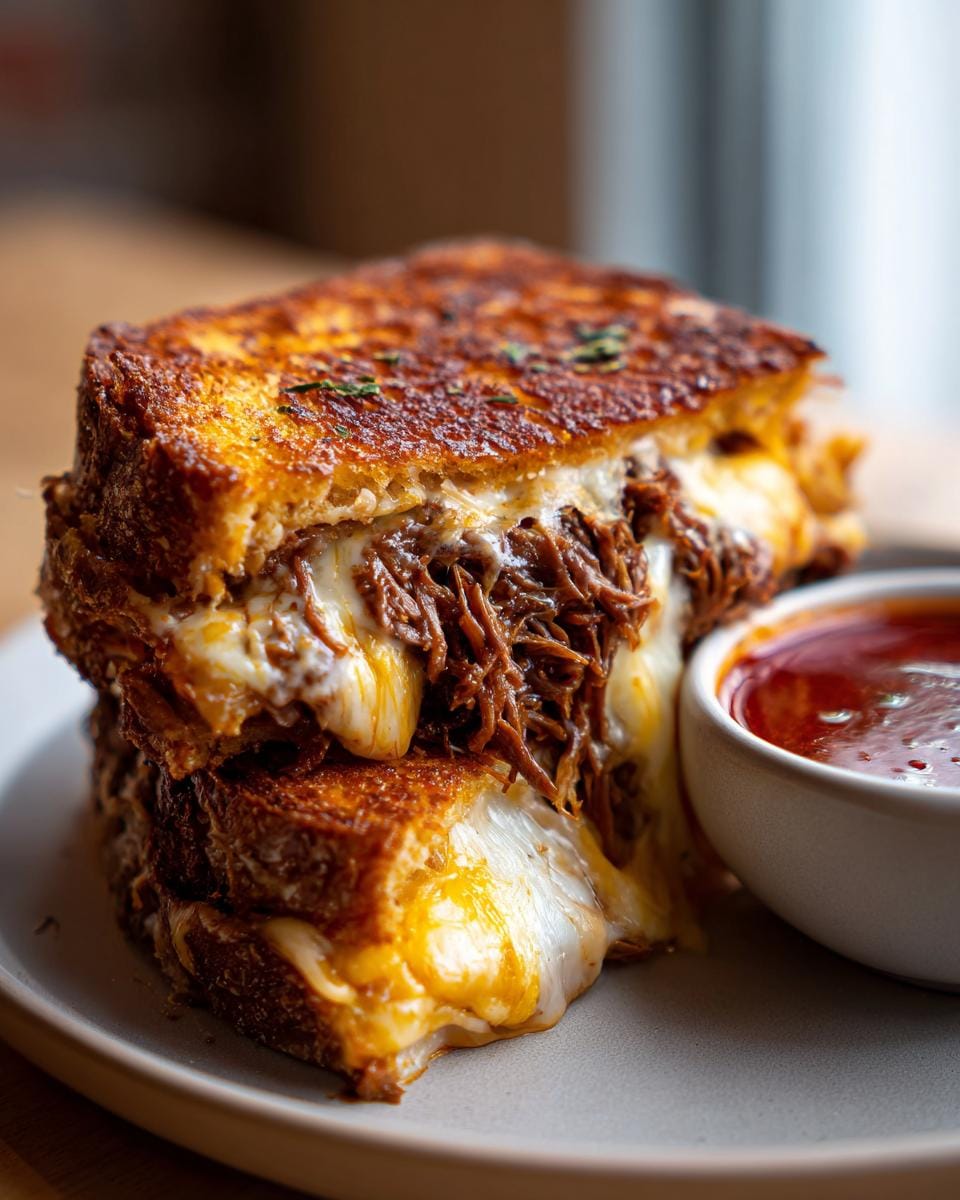
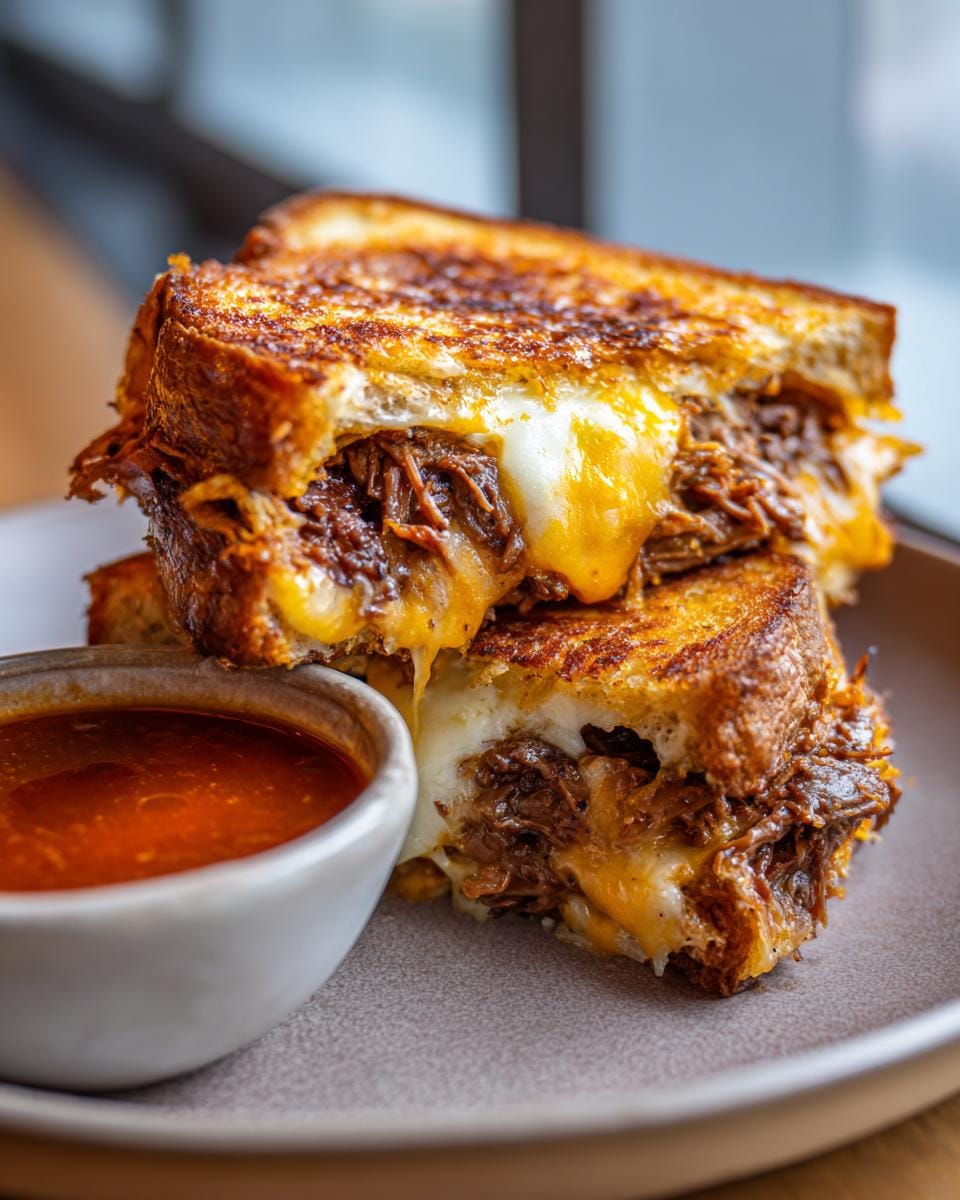
Okay, I have to tell you about my latest obsession: the Birria Grilled Cheese. Seriously, forget everything you thought you knew about grilled cheese because THIS is a game-changer. It’s that incredible, rich, slow-cooked beef from classic birria tacos, but then piled high with melty cheese between two slices of perfectly golden, buttery bread. And the best part? You get to dip the whole cheesy, beefy masterpiece into that savory, smoky consommé. I first whipped this up when I had leftover birria from a big weekend batch and stared at it thinking, “How can I make this even *better*?” The answer was obvious. It’s pure comfort food magic, and trust me, it tastes way more complicated than it actually is to make.
Why You’ll Love This Birria Grilled Cheese
- It’s ridiculously easy to make, especially if you already have leftover birria!
- The flavor combo of tender, spiced beef and gooey, melted cheese is out-of-this-world good.
- You get that amazing crispy texture from the grilled bread and the satisfying chew from the beef.
- It’s the ultimate comfort food – perfect for a cozy lunch or a hearty dinner.
- Dipping it into the rich consommé takes it to a whole new level of deliciousness!
Ingredients for Your Birria Grilled Cheese
Okay, so you’ll need stuff for the birria itself, but don’t worry, most of it is just pantry staples! And then, of course, the goodies for the sandwich part. My go-to is a good chuck roast because it gets so tender and shreddy. And for the cheese, you really want a mix that melts beautifully, so Oaxaca and mozzarella are my dream team here.
- 2 pounds beef chuck roast
- 1 teaspoon kosher salt
- 1 teaspoon black pepper
- 1 teaspoon smoked paprika
- 1 teaspoon garlic powder
- 1 teaspoon onion powder
- 1 tablespoon olive oil
- 4 cups low sodium beef broth
- 1 can (15 ounces) fire roasted diced tomatoes
- 2 tablespoons tomato paste
- 1 tablespoon apple cider vinegar
- 1 teaspoon cumin
- 1 teaspoon chili powder
- 8 slices sourdough bread
- 2 cups shredded Oaxaca cheese
- 2 cups shredded mozzarella cheese
- 2 tablespoons butter
- 2 tablespoons chopped cilantro
Crafting the Perfect Birria Grilled Cheese: Step-by-Step
This is where the magic happens! Don’t be intimidated by the long cook time for the birria; most of it is hands-off simmering. My biggest tip? Get that chuck roast seared really well. It adds a depth of flavor that makes all the difference, trust me. And always, always save that consommé – it’s liquid gold for dipping! If you’re making this from scratch, you might even want to whip up some sourdough discard garlic knots to go with it, though the grilled cheese itself is a full meal!
- First things first, let’s get that beef seasoned up! Grab your beef chuck roast and give it a good rubdown with the kosher salt, black pepper, smoked paprika, garlic powder, and onion powder. Make sure it’s coated evenly on all sides.
- Now, heat your olive oil in a big, sturdy pot over medium-high heat. Once it’s nice and hot – you’ll see it shimmering a bit – carefully add your seasoned beef. Sear it for about 3 minutes per side until it’s got a beautiful deep brown crust. This searing step is SO important for flavor!
- Time to build the braising liquid! Pour in the beef broth, then add the can of fire-roasted diced tomatoes (juices and all!), tomato paste, apple cider vinegar, cumin, and chili powder. Give it all a good stir to combine everything.
- Bring the liquid to a gentle simmer, then reduce the heat to low. Cover the pot tightly. Let it cook slowly for 3 to 4 hours. You want that beef to get so tender it practically falls apart when you poke it. **Food safety note:** Make sure the internal temperature of the beef reaches at least 145°F, and let it rest for 3 minutes after cooking.
- Once the beef is fork-tender, carefully remove it from the pot onto a plate or cutting board. Grab two forks and shred all that juicy, tender meat. While the meat is still warm, scoop out about 2 cups of the rich cooking broth – this is your precious consommé for dipping! Set it aside in a small saucepan to keep warm.
- Now for the grilled cheese part! Get a skillet (or griddle) heating over medium heat. Slather one side of each slice of sourdough bread with butter.
- Place four slices of bread, butter-side down, onto your preheated skillet. Layer each slice generously with Oaxaca cheese, then pile on a good amount of your shredded birria beef. Top the beef with the shredded mozzarella cheese and sprinkle with chopped cilantro.
- Finally, place the remaining four slices of bread on top, butter-side up. Cook for about 3 to 4 minutes per side. You’re looking for that perfect golden-brown crust on the bread and gloriously melted, gooey cheese oozing out. Gently press the sandwiches with your spatula as they cook to help them get extra crispy.
- Once they’re perfectly golden and melty, slice those beauties in half. Serve them immediately with the warm reserved consommé for the ultimate dipping experience. Seriously, that broth just makes everything better! You can even let the consommé sit with the leftover shredded beef juices for a few minutes in that pot to get even richer.
Serving Suggestions for Your Birria Grilled Cheese
This cheesy, beefy sandwich is practically a meal on its own, but I love pairing it with a few things to round out the meal. Here are some of my faves:
Creamy Macaroni Salad: A classic for a reason! The cool, creamy texture of this macaroni salad is a perfect contrast to the warm, spicy birria grilled cheese. Plus, all those crunchy veggies add a nice little bite. It’s like the perfect chill-out partner for your sandwich. So good with this creamy mac salad!
Broccoli Apple Salad: If you want something a bit lighter but still super satisfying, this salad is it. The sweet, crisp apples and broccoli with a zesty dressing cut through the richness of the birria and cheese beautifully. It’s refreshing and adds fantastic texture. You’ve got to try it with this broccoli apple salad!
Simple Green Salad with Lime Vinaigrette: Sometimes, you just need something fresh and zesty. A quick salad with mixed greens, maybe some red onion and jalapeño, tossed with a bright lime vinaigrette is perfect. It cleanses the palate and makes the whole meal feel a little less heavy, while still being super flavorful.
Storing and Reheating Your Birria Grilled Cheese
Okay, so you’ve got leftovers – lucky you! The key here is to store the birria meat and the consommé separately from the assembled grilled cheese. Trying to reheat a whole sandwich often leads to a soggy mess, and nobody wants that! But trust me, storing the components makes transforming leftovers into a fresh, delicious meal a total breeze.
First off, let that leftover birria meat cool down completely. Once it’s at room temperature, pop it into an airtight container and stash it in the fridge. It’ll be good for about 3-4 days. The consommé? Just pour that liquid gold into its own sealed container and keep it in the fridge too. It also lasts for about 3-4 days, maybe even a bit longer if you’re lucky!
Now, for reheating. If you want that glorious birria meat for tacos or just to add to something new, you can reheat it in a skillet over medium heat until it’s nice and steamy, or pop it in the microwave for about 90 seconds. For the consommé, just gently warm it up on the stovetop or in the microwave. Skip reheating the actual grilled cheese unless you plan to remake it fresh! My favorite meal prep trick is to make a big batch of birria meat on Sunday, then I can throw together a quick, amazing grilled cheese any day of the week when that craving strikes.
Frequently Asked Questions About Birria Grilled Cheese
Can I make the birria meat ahead of time?
Absolutely! That’s my favorite way to prep. You can make the birria meat a day or two in advance and store it in the fridge. It actually tastes even better the next day! Then, all you have to do is shred it and assemble your sandwiches. It makes weeknight dinners so much easier!
What kind of cheese is best for this Birria Grilled Cheese?
While I love a mix of Oaxaca and mozzarella for that perfect melty stretch and mild flavor, you can totally swap them out! A good Monterey Jack or even a mild white cheddar would also melt beautifully and complement the birria flavors. The key is to use a cheese that melts well and isn’t too overpowering.
I don’t have beef chuck roast, what else can I use?
No problem at all! Beef brisket or even a nicely marbled pork shoulder would work wonderfully for the birria braise. You just want a cut of meat that’s going to become super tender after a long, slow cook. The goal is that delicious, shreddable texture that soaks up all those amazing flavors. Check out our disclaimer for more info on ingredient usage.
Before You Go
Seriously, give this Birria Grilled Cheese a try! It’s more than just a sandwich; it’s an experience. Let me know in the comments how yours turns out, or if you have any fun twists to add. I can’t wait to hear what you think!
Birria Grilled Cheese
Ingredients
Equipment
Method
- Season the chuck roast with salt, black pepper, smoked paprika, garlic powder, and onion powder.
- Heat olive oil in a large pot over medium-high heat. Sear the beef for 3 minutes per side until browned.
- Add beef broth, diced tomatoes, tomato paste, apple cider vinegar, cumin, and chili powder to the pot.
- Cover and simmer on low heat for 3 to 4 hours until the beef is fork tender. Cook beef to a minimum internal temperature of 145°F with a 3 minute rest for food safety.
- Remove the beef and shred with two forks. Reserve 2 cups of the cooking broth for dipping.
- Heat a skillet over medium heat and butter one side of each bread slice.
- Place 4 slices butter side down onto the skillet. Top each with shredded Oaxaca cheese, shredded beef, mozzarella cheese, and cilantro.
- Add the remaining bread slices butter side up.
- Cook for 3 to 4 minutes per side until the bread is golden brown and the cheese is fully melted. For the crispiest grilled cheese texture, press the sandwiches gently with a spatula while cooking.
- Slice the sandwiches and serve hot with warm reserved broth for dipping. The reserved dipping broth becomes even richer after sitting for a few minutes with the shredded beef juices stirred in.