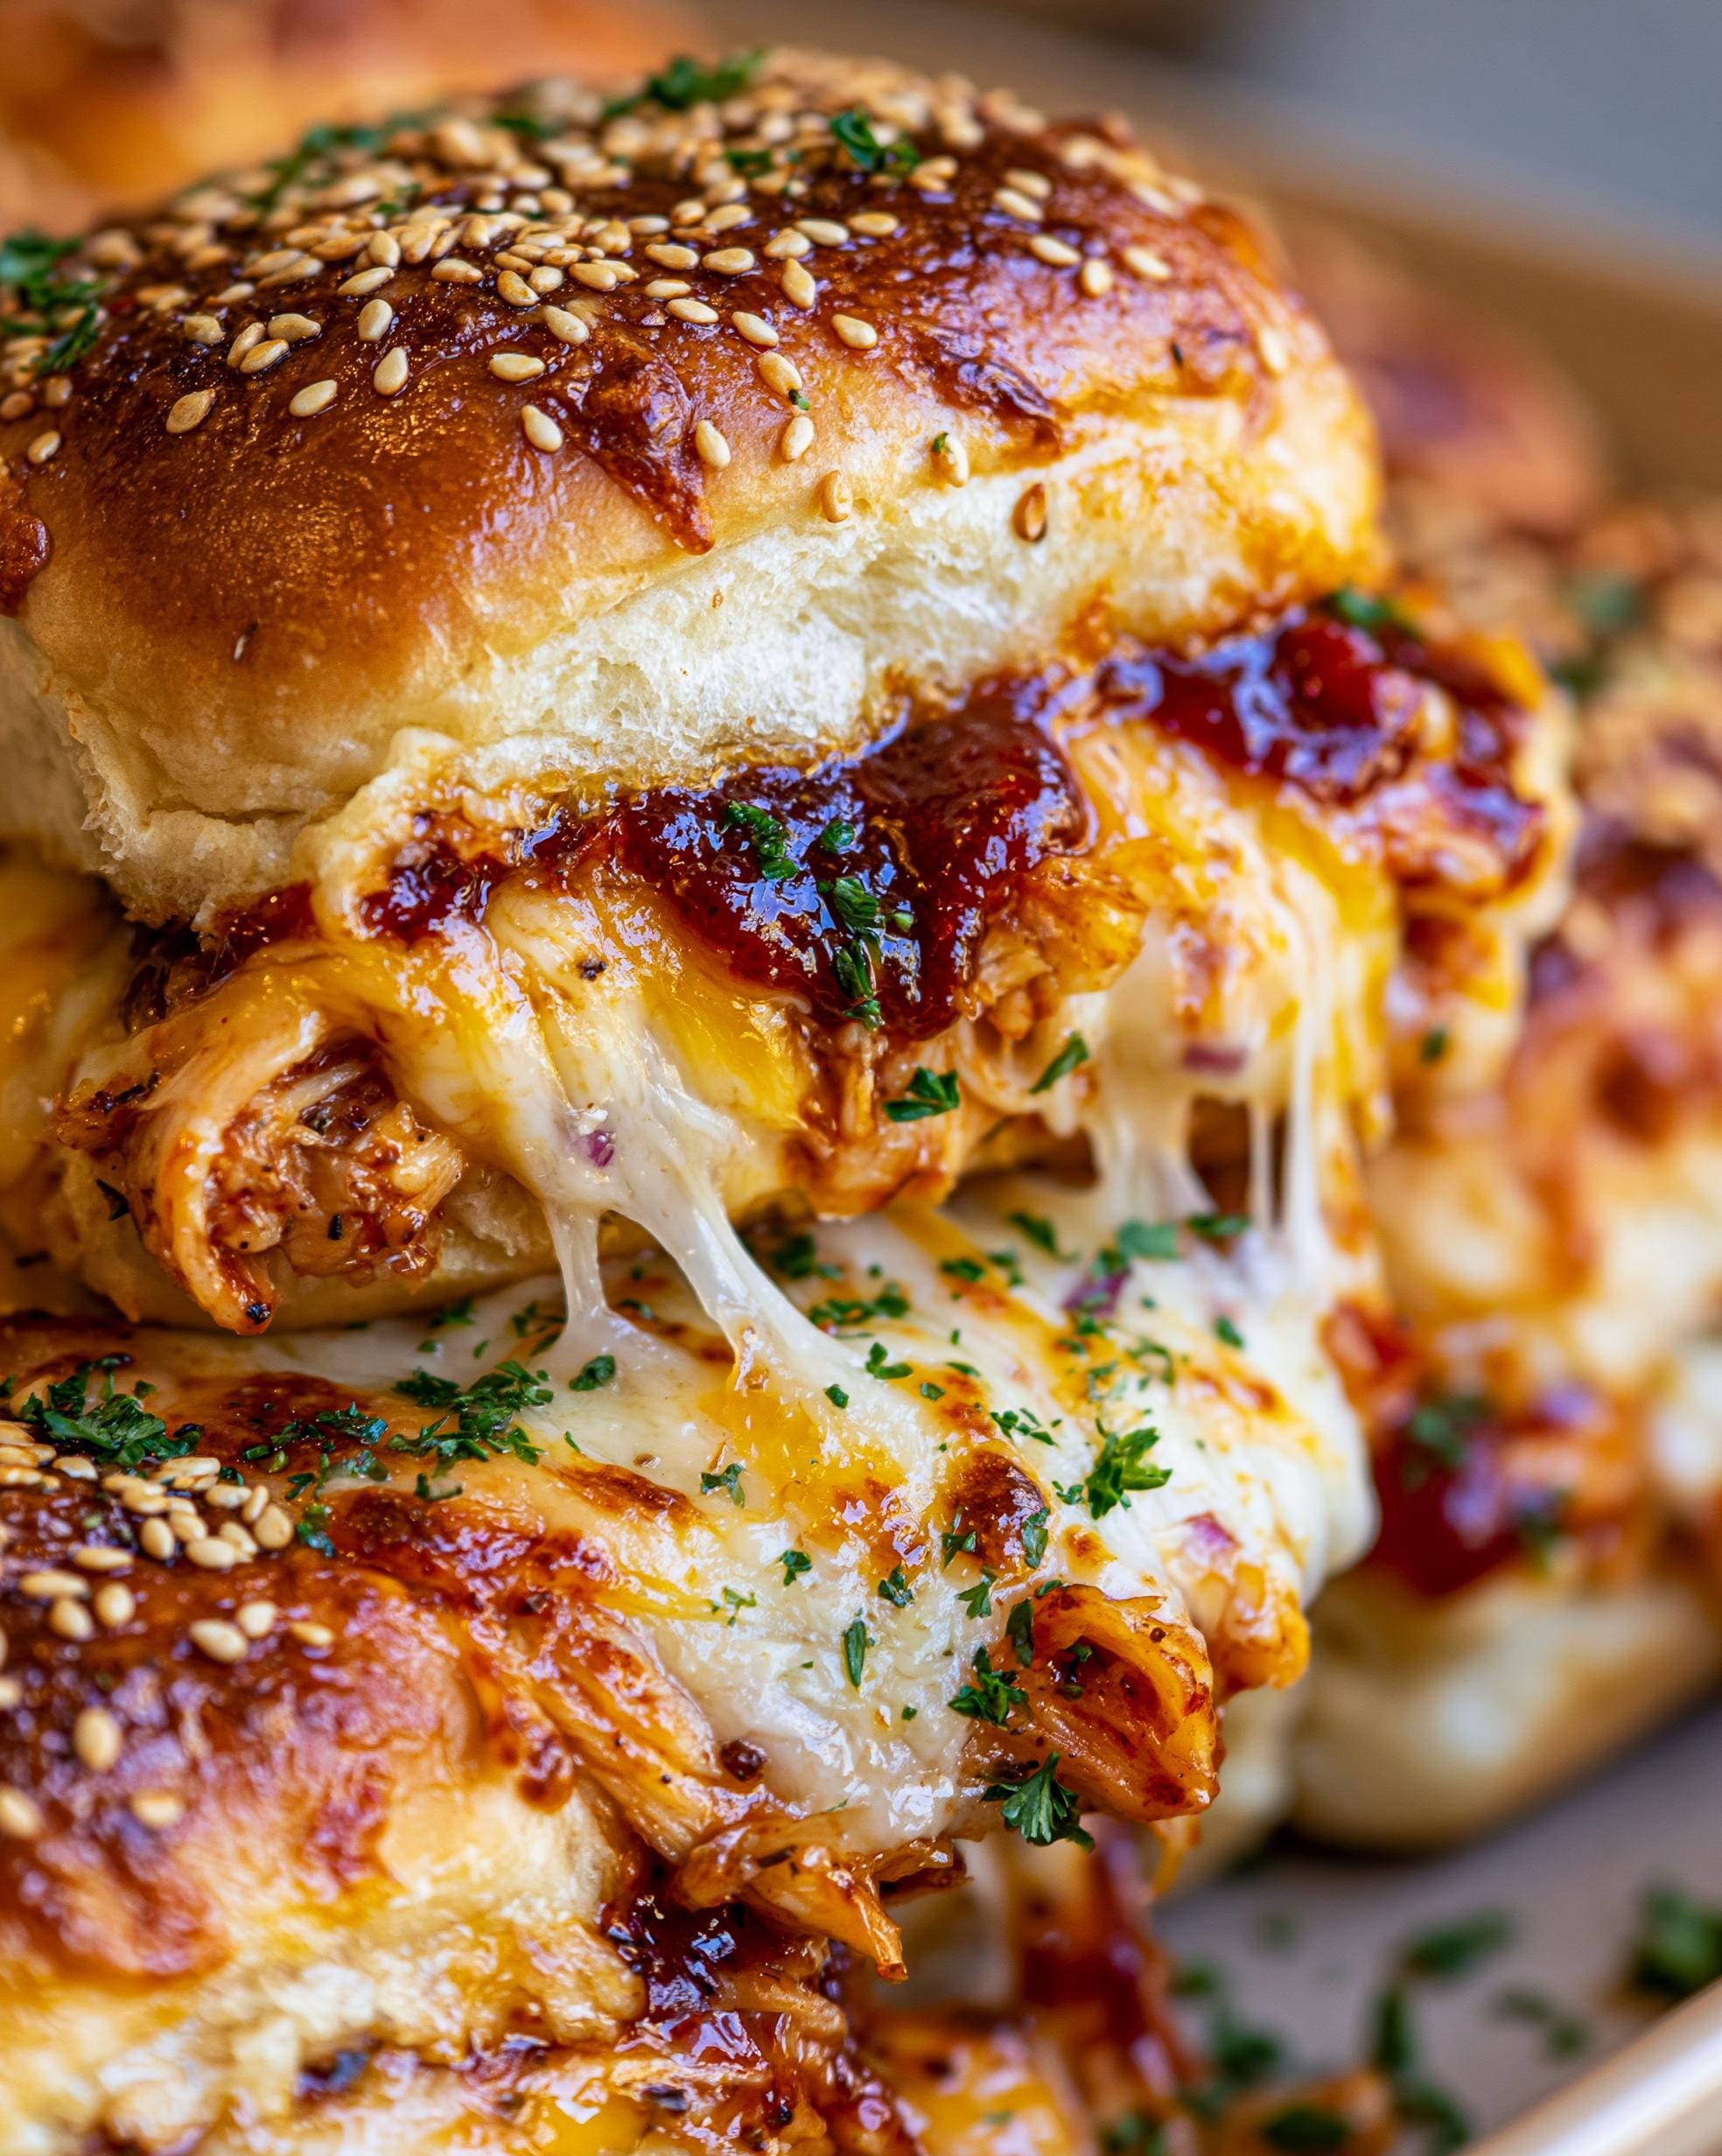
Okay, let’s be real. There are times when you just need food that makes people happy without you spending the whole day in the kitchen, right? That’s exactly why these BBQ Chicken Sliders are my secret weapon. I first threw them together for a last-minute football watch party a few years ago, and now my friends won’t let me show up without them. They’re the ultimate “looks like you tried” dish that’s secretly a no-brainer.
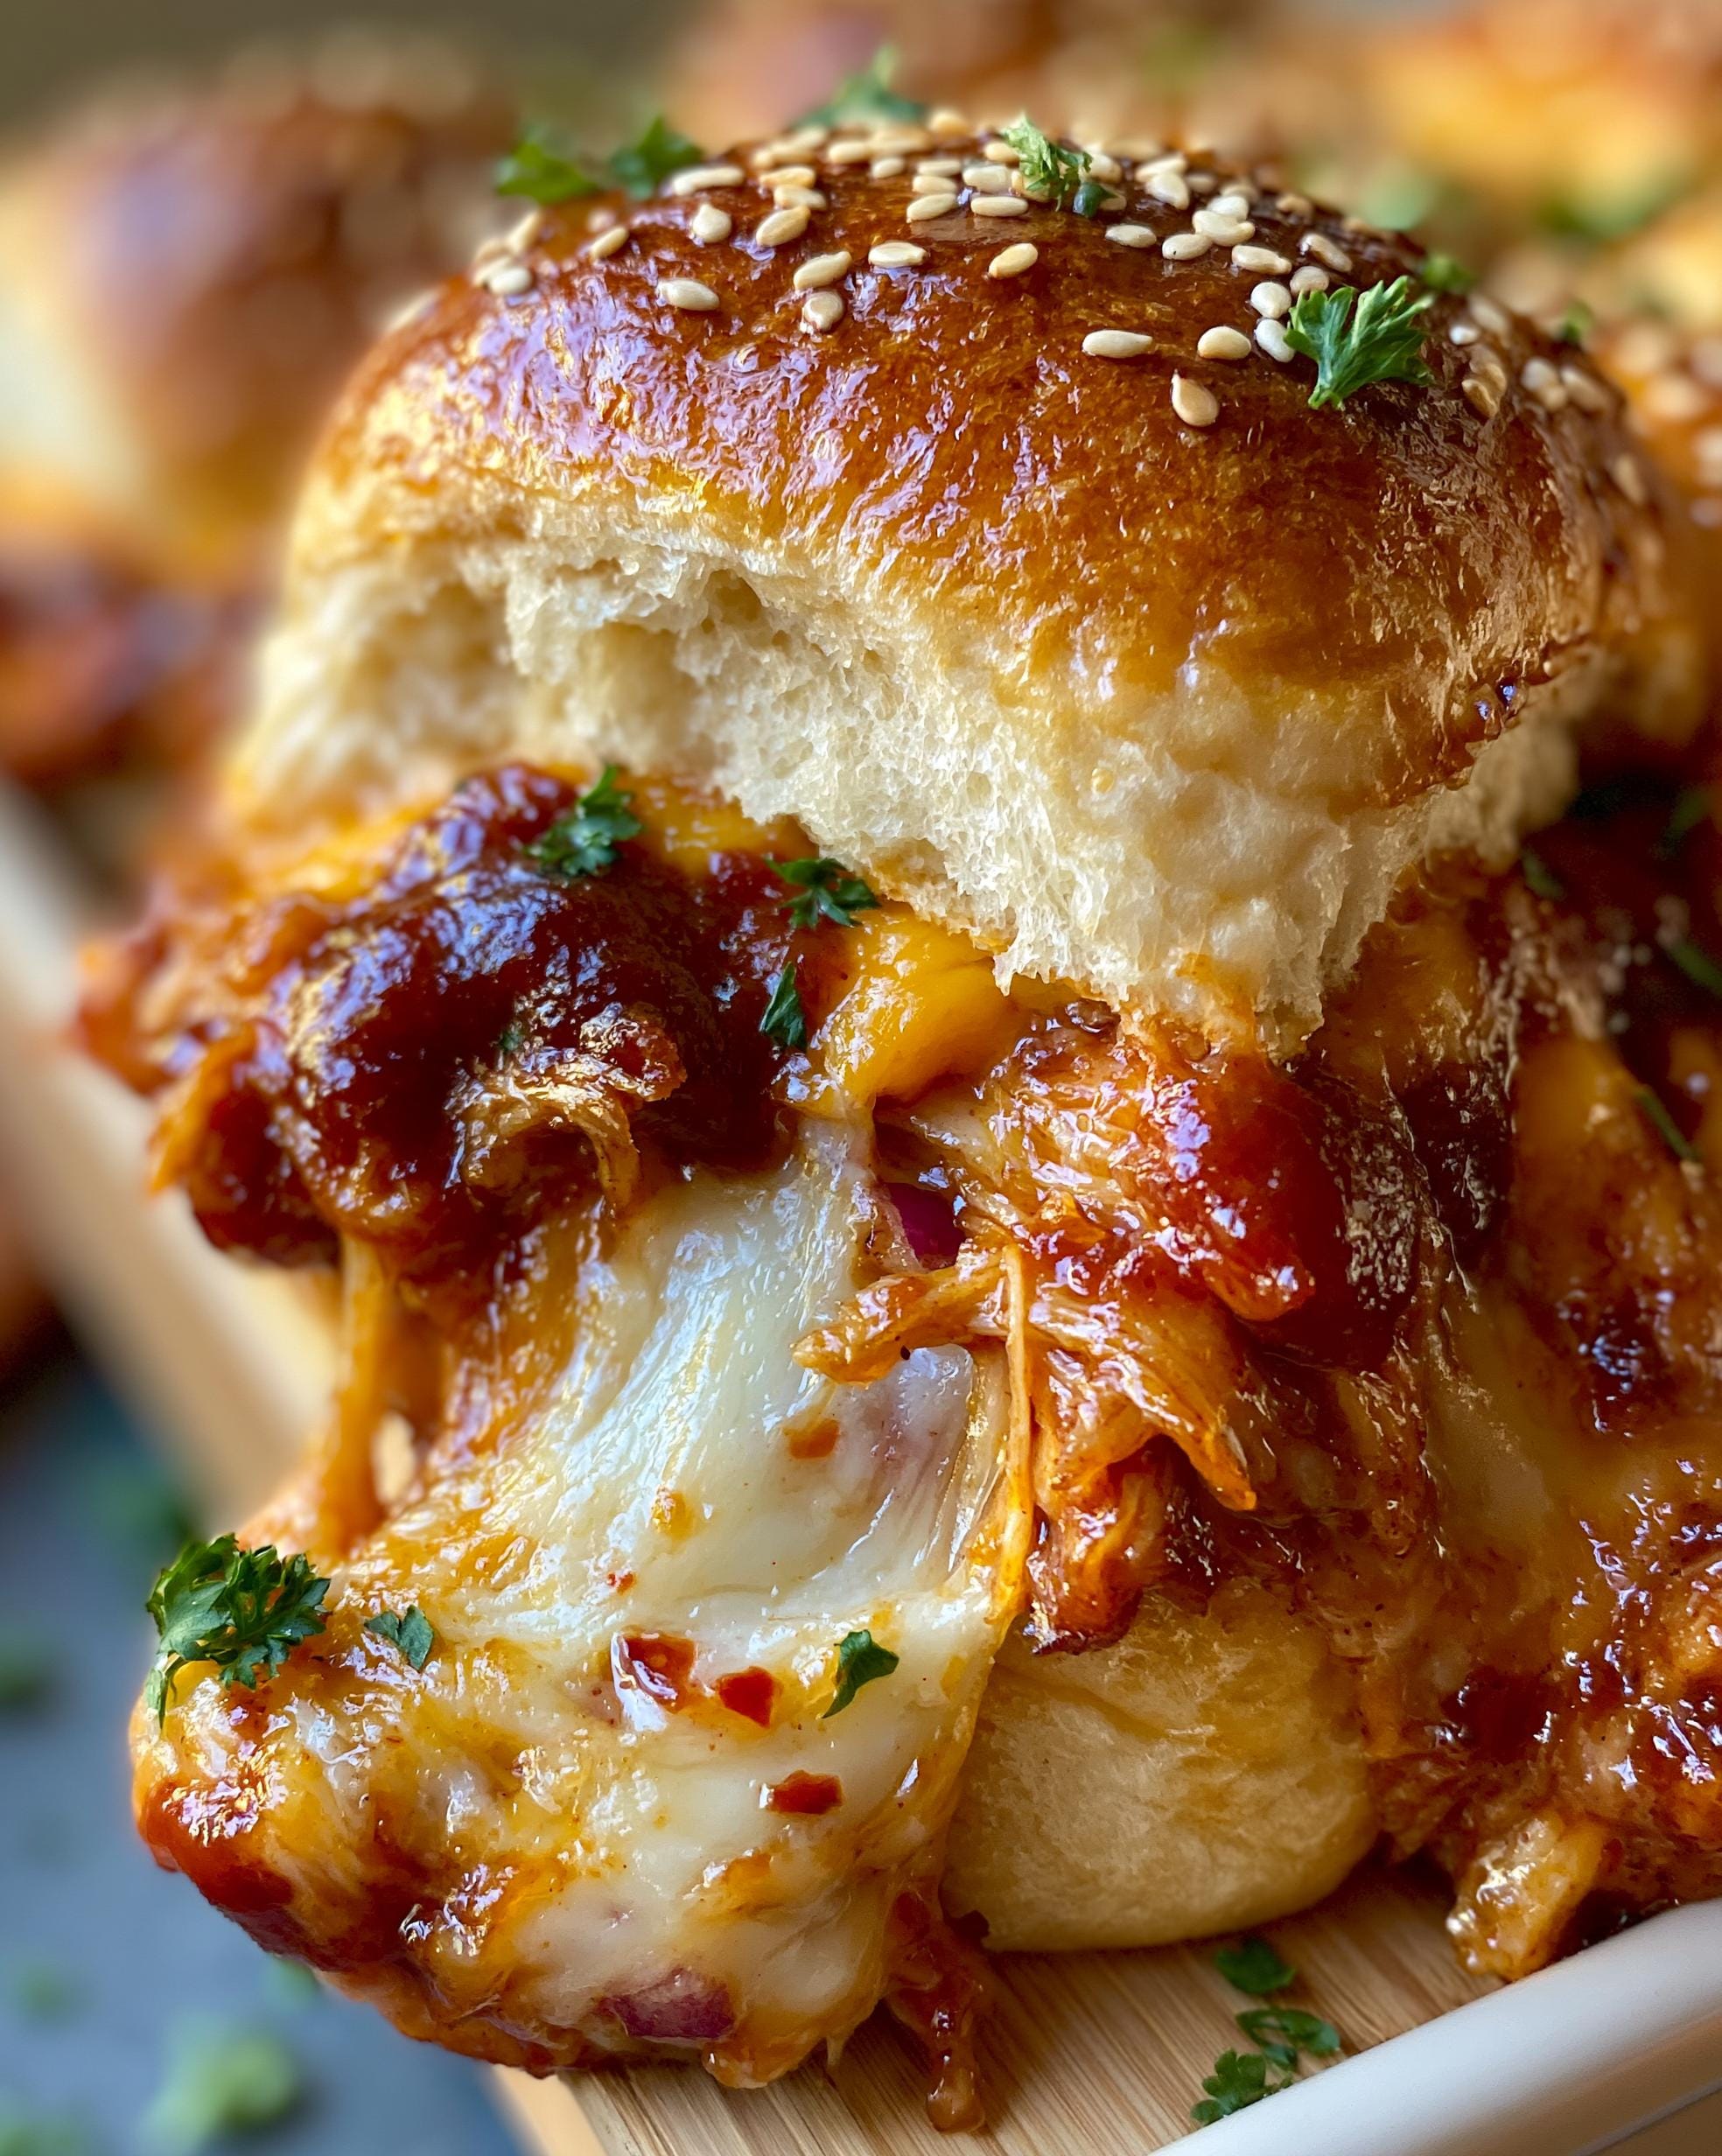
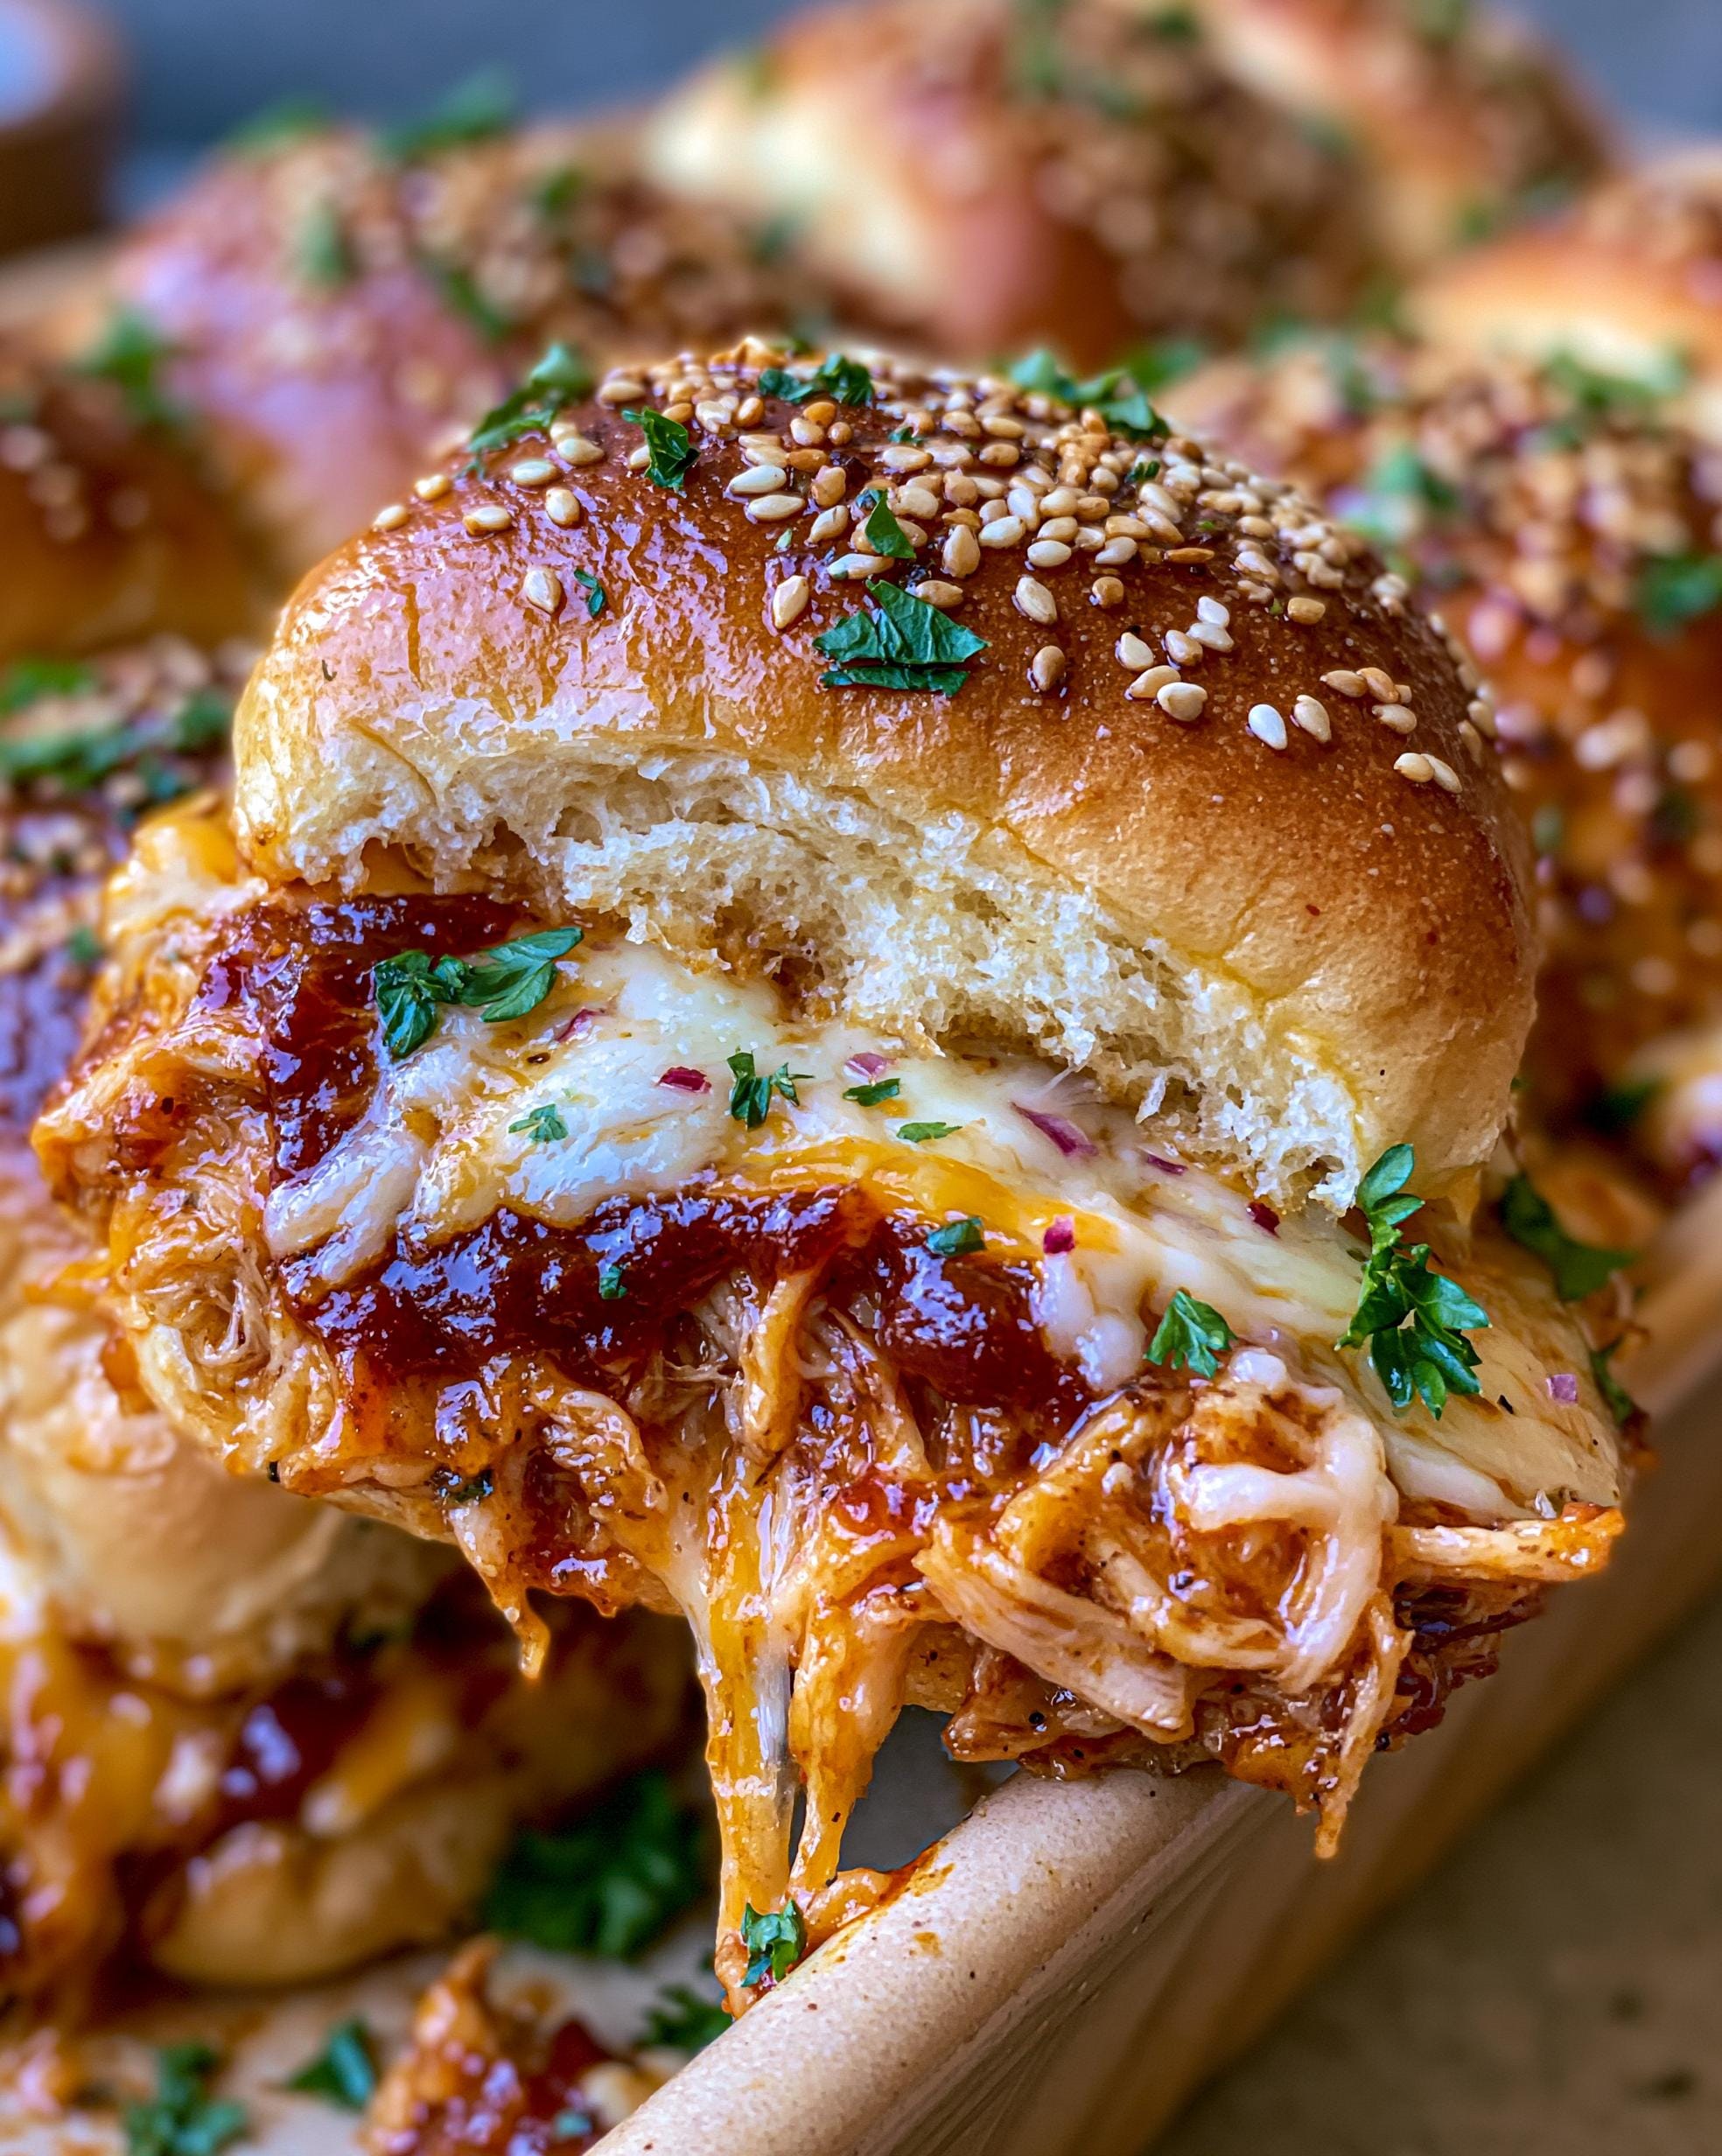
The magic is in how simple they are. You get juicy, saucy chicken and tons of melty cheese all baked into those sweet, soft Hawaiian rolls. The whole thing comes together in about 40 minutes, and most of that is hands-off oven time. It’s minimal prep for maximum payoff, and with over 19 grams of protein per slider, they’re actually satisfying, not just snack food. Trust me, once you see how fast a pan of these disappears, you’ll understand why they’re always on my menu.
Why You’ll Love These BBQ Chicken Sliders
Honestly, I make these BBQ Chicken Sliders so often because they fix every “what’s for dinner?” dilemma. They’re my go-to when I need something guaranteed to please everyone, fast.
- They’re Seriously Quick: From grabbing the pan to pulling it out of the oven, it’s about 40 minutes total. Most of that is baking time, so you can tidy up or, you know, pour yourself a drink.
- Impossible to Mess Up: This is a no-stress recipe. You’re just mixing, layering, and baking. If you can use a spoon, you can make these.
- Crowd-Feeding Magic: One pan makes 12 sliders, and they’re the perfect shareable size for parties, game day, or big family dinners. I’ve watched a whole tray vanish in under 10 minutes.
- Packed with Protein: Each slider has about 19 grams of protein from the chicken and cheese, so they’re actually filling and will keep everyone satisfied. I often use pre-cooked chicken like slow cooker pulled chicken to make it even easier.
- Totally Your Own: Swap the cheese, add some pickles or jalapeños, use different rolls – make it your way. The basic blueprint is foolproof.
Ingredients for BBQ Chicken Sliders
The ingredient list is super simple, which is part of why I love this recipe. My biggest tip? Use a barbecue sauce you genuinely like to eat on its own – it’s the star flavor here, so cheap, super-sweet sauce won’t do you any favors.
- 12 Hawaiian slider rolls (keep them connected in the package!)
- 3 cups cooked shredded chicken breast (from about 1.5 lbs raw chicken)
- 1 cup barbecue sauce (go for your favorite brand)
- 8 slices cheddar cheese
- 1 cup shredded mozzarella cheese
- 2 tablespoons finely diced red onion
- 2 tablespoons chopped fresh parsley
- 2 tablespoons unsalted butter, melted
- 1 teaspoon garlic powder
- 1 teaspoon sesame seeds
How to Make BBQ Chicken Sliders
Okay, let’s get these sliders in the oven. I promise it’s easier than it looks. The trick is to do a little assembly line: get your rolls sliced, your chicken mixed, and your butter melted. Then it’s just layering and baking. My family loves when I make these with air fryer chicken thighs for extra juicy meat, but any cooked chicken works perfectly.
Step 1: First things first, get that oven preheating to 350°F. This way, by the time you’re done assembling, the oven is hot and ready to go. Trust me, it makes the whole process feel faster.
Step 2: Grab your whole package of Hawaiian rolls. You want to slice the entire block in half horizontally, so you have one big top and one big bottom piece, but keep all the rolls connected. I use a long serrated knife and just go slow. Place that bottom slab right into your 9×13 baking dish.
Step 3: In a big bowl, toss your shredded chicken with the barbecue sauce. Mix it until every single strand is coated and saucy. This is your flavor base, so don’t be shy!
Step 4: Layer the cheddar cheese slices over the bottom rolls. They might overlap a little, and that’s totally fine. More cheese is never a bad thing in my book.
Step 5: Now, spread all that saucy chicken evenly over the cheese layer. Try to get it right to the edges so every bite gets some.
Step 6: Sprinkle the shredded mozzarella, diced red onion, and fresh parsley over the chicken. The mozzarella gives that amazing stretchy melt, and the onion adds a nice little crunch.
Step 7: Pop the top half of the rolls back on, like you’re putting a lid on the most delicious sandwich ever.
Step 8: In a small bowl, mix your melted butter with the garlic powder. Brush this all over the tops of the rolls—this is what gives them that gorgeous golden color and flavor. Then, sprinkle with sesame seeds.
Step 9: Here’s the key for soft, melty sliders: cover the whole dish loosely with aluminum foil. Bake it like this for 15 minutes. The foil traps steam and melts the cheese without burning the tops.
Step 10: Carefully take the foil off (watch out for steam!) and bake for another 8 to 10 minutes. You’re looking for beautifully golden brown tops and you should see the cheese bubbling around the edges. They’ll smell incredible.
Step 11: This might be the hardest step, but let them rest for 5 minutes after baking. It lets the cheese set a bit so when you slice them, everything doesn’t just ooze out. Use a sharp knife to slice between the rolls.
Pro Tip: For a serious flavor boost, brush a thin layer of extra barbecue sauce on the cut side of the top buns before you place them on the filling. It’s a game-changer. This trick works for all kinds of dishes, like my BBQ chicken flatbreads too!
Storing and Reheating Your Sliders
These sliders are almost as good the next day, and I love having a couple stashed away for a quick lunch. Here’s my no-fuss system for keeping them tasty.
Let your sliders cool completely after baking. Then, store them in an airtight container in the fridge. They’ll stay good for up to 3 days. Honestly, the chicken just gets more flavorful.
To reheat, I have two ways. For the best texture, wrap a few sliders in foil and warm them in a 300°F oven for about 10 minutes, until the cheese is melty again. If I’m in a hurry, I’ll microwave a single slider for 20-30 seconds. It works perfectly!
My favorite meal prep trick? You can assemble the whole pan of unbaked sliders, cover it tightly with plastic wrap or foil, and refrigerate it overnight. In the morning, just pop it in the oven. You might need to add 2-3 extra minutes to the bake time since it’s going in cold. It’s such a lifesaver for busy days.
BBQ Chicken Sliders FAQ
I get asked about these sliders all the time, so here are the quick answers to the most common questions that pop up in my kitchen and from friends.
Can I use a different kind of roll?
Absolutely! Hawaiian rolls are my favorite because their sweetness is magic with the tangy BBQ sauce, but brioche or soft potato rolls work great too. Just try to keep them connected in a slab so the assembly stays easy. If you use a crustier roll, you might want to brush a little butter on the inside to keep them from drying out.
Can I make these BBQ Chicken Sliders ahead of time?
Yes, and it’s a total lifesaver for parties. Assemble the whole pan, cover it tightly with plastic wrap or foil, and stash it in the fridge overnight. When you’re ready, bake as directed, but add 2-3 extra minutes since you’re starting with a cold pan. The rolls might get a tiny bit softer, but all the flavors melt together even better.
What’s the easiest way to shred the chicken?
My go-to is using two forks to pull it apart, but if I’m making a big batch, I use my hand mixer on low speed for super quick, fine shreds. Honestly, grabbing a rotisserie chicken from the store is the ultimate shortcut and tastes fantastic. That’s my secret for so many quick meals, like these speedy rotisserie chicken tostadas.
Nutrition Information for BBQ Chicken Sliders
I want to be totally up front about this – I’m a home cook, not a lab! The numbers can change depending on the brands you pick.
The nutritional information provided is just an estimate. It’ll definitely vary based on the specific brands of barbecue sauce, cheese, and chicken you use in your kitchen. For precise dietary calculations, I always recommend plugging the exact products you buy into your favorite nutrition calculator.
Before You Go
Alright, that’s my slider secret! I really hope you give this easy recipe a try.
I hope your crew goes crazy for these BBQ Chicken Sliders like mine always does. They’re just one of those happy, reliable recipes. If you do make them, please tell me how it went! Leave a comment or tag me in a photo over on Facebook—I love seeing your kitchen creations.
BBQ Chicken Sliders
Ingredients
Equipment
Method
- Preheat the oven to 350°F.
- Slice the slider rolls in half horizontally while keeping the rolls connected. Place the bottom half in a 9 x 13-inch baking dish.
- In a large bowl, combine the shredded chicken and barbecue sauce until evenly coated.
- Layer the cheddar cheese slices over the bottom half of the rolls.
- Spread the barbecue chicken mixture evenly over the cheese.
- Sprinkle the mozzarella cheese, red onion, and parsley over the chicken.
- Place the top half of the rolls over the filling.
- Mix the melted butter and garlic powder in a small bowl. Brush over the tops of the rolls and sprinkle with sesame seeds.
- Cover loosely with foil and bake for 15 minutes.
- Remove the foil and bake for 8 to 10 minutes more until the tops are golden and the cheese is fully melted.
- Let the sliders rest for 5 minutes before slicing and serving.
- If using freshly cooked chicken, ensure it reaches an internal temperature of 165°F before shredding and serving.