Oh, Blackstone chicken breasts! If you haven’t tried cooking chicken on a griddle yet, you are in for a treat. There’s something magical about that screaming hot surface that gives chicken the most incredible crispy edges while keeping the inside unbelievably juicy. I remember the first time I made these Blackstone Chicken Breasts for my family; they were instantly hooked. We’re talking dinner on the table in under 25 minutes, with hardly any fuss. Seriously, this method makes boneless, skinless chicken breasts feel like a gourmet meal, and it’s become my go-to for busy nights when I need something delicious and fast.
Why You’ll Love These Blackstone Chicken Breasts
- Super Quick! Dinner is ready in a flash, perfect for those rushed weeknights.
- Incredibly Juicy & Flavorful: The griddle locks in moisture, giving you tender chicken with amazing crispy bits.
- So Easy to Make: Simple seasonings and a straightforward process mean less stress in the kitchen.
- Healthy & High-Protein: A fantastic way to get lean protein without sacrificing taste.
- Versatile Dinner Star: Goes with practically anything you can dream up!
Ingredients for Perfect Blackstone Chicken Breasts
You don’t need a ton of fancy stuff for this recipe! The key is really good quality chicken breasts. I always try to grab ones that are pretty uniform in thickness, or I’ll lightly pound them myself so they cook evenly. For the seasonings, pretty much anything you love works, but this combo of salt, pepper, garlic, onion, smoked paprika, and Italian seasoning is a winner in my house. Trust me, even the pickiest eaters gobble these up!
- 4 boneless, skinless chicken breasts
- 2 tablespoons olive oil
- 1 teaspoon salt
- 1 teaspoon black pepper
- 1 teaspoon garlic powder
- 1 teaspoon onion powder
- 1 teaspoon smoked paprika
- 1 teaspoon Italian seasoning
- 1 tablespoon butter
- 1 tablespoon fresh lemon juice
- 1 tablespoon chopped fresh parsley, for garnish
Step-by-Step Guide to Blackstone Chicken Breasts
I recommend getting your Blackstone preheated while you do the prep work. It makes dinner so much faster!
Step 1: Crank up your Blackstone griddle to medium-high heat. While it’s getting nice and hot, grab your chicken breasts and pat them really, really dry with paper towels. This is seriously important – it’s what helps you get that amazing golden crust instead of just steaming the chicken.
Step 2: If your chicken breasts are on the thicker side in one spot, just give them a quick, gentle pound with a meat mallet or even a rolling pin (protected by plastic wrap, of course!) to even them out. We want everything to cook evenly, you know? If you’re looking for other great chicken recipes, check out my Cowboy Butter Chicken Bites or these Crispy Parmesan Chicken Thighs for more delicious ideas.
Step 3: Toss those dried chicken breasts into a bowl and drizzle them with the olive oil. Get your hands in there (or use tongs) and make sure every piece is coated.
Step 4: Now for the fun part: seasoning! Sprinkle all those yummy spices – salt, pepper, garlic powder, onion powder, smoked paprika, and Italian seasoning – generously over both sides of the chicken. Don’t be shy! I like to press the seasonings in a little.
Step 5: Carefully lay the seasoned chicken breasts onto the hot Blackstone. Try not to crowd them; give them some breathing room so they can truly sear. Let them cook for about 5 to 6 minutes without touching them. You’re looking for a deep golden-brown crust to form on the bottom.
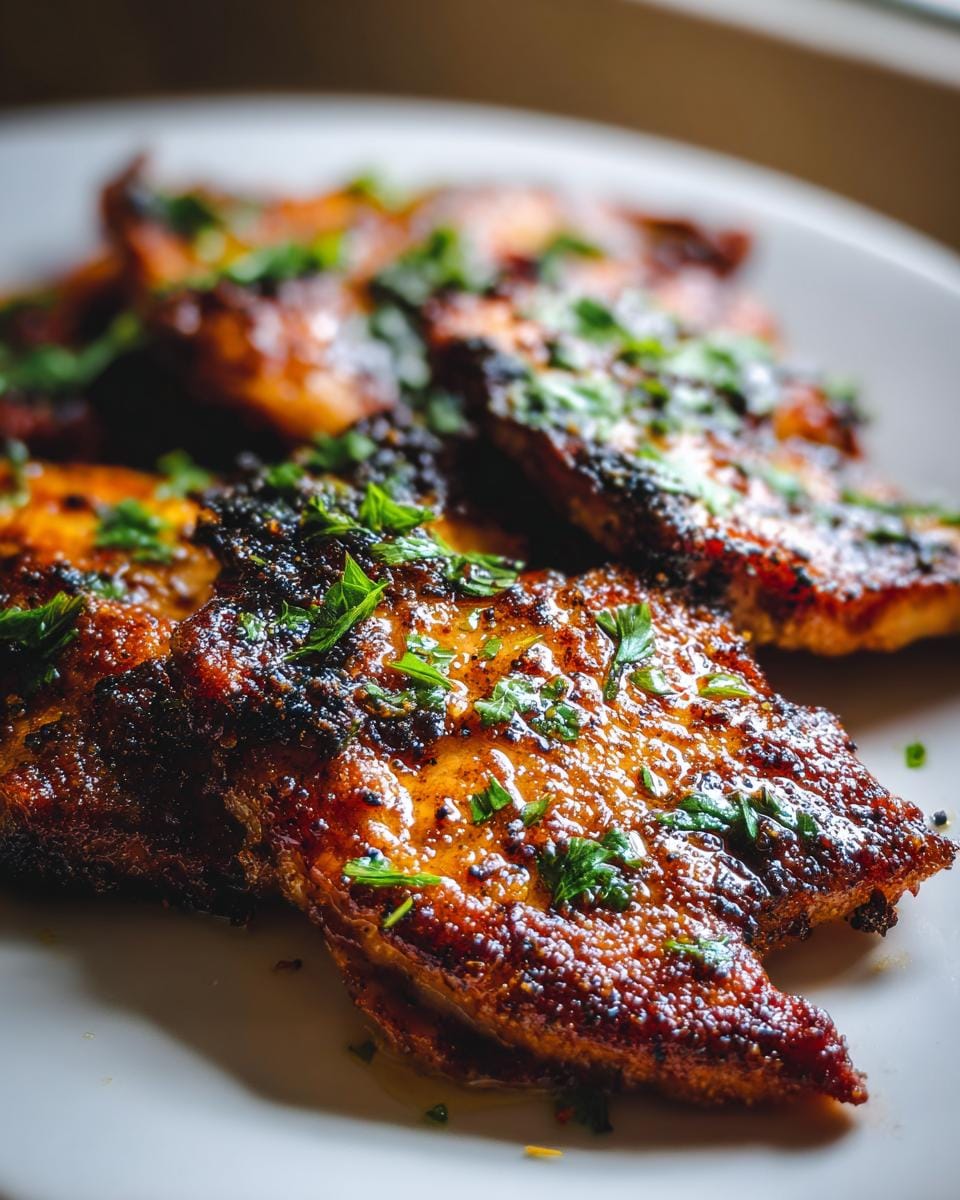
Step 6: Flip those beautiful chicken breasts over. Cook for another 5 to 6 minutes. The best way to know they’re done is to check the internal temperature with a meat thermometer. You want it to hit 165°F (74°C).
Step 7: During the last minute of cooking, toss that tablespoon of butter onto the griddle next to the chicken. As it melts, use a spoon to baste it over the chicken breasts. It adds such a lovely richness!
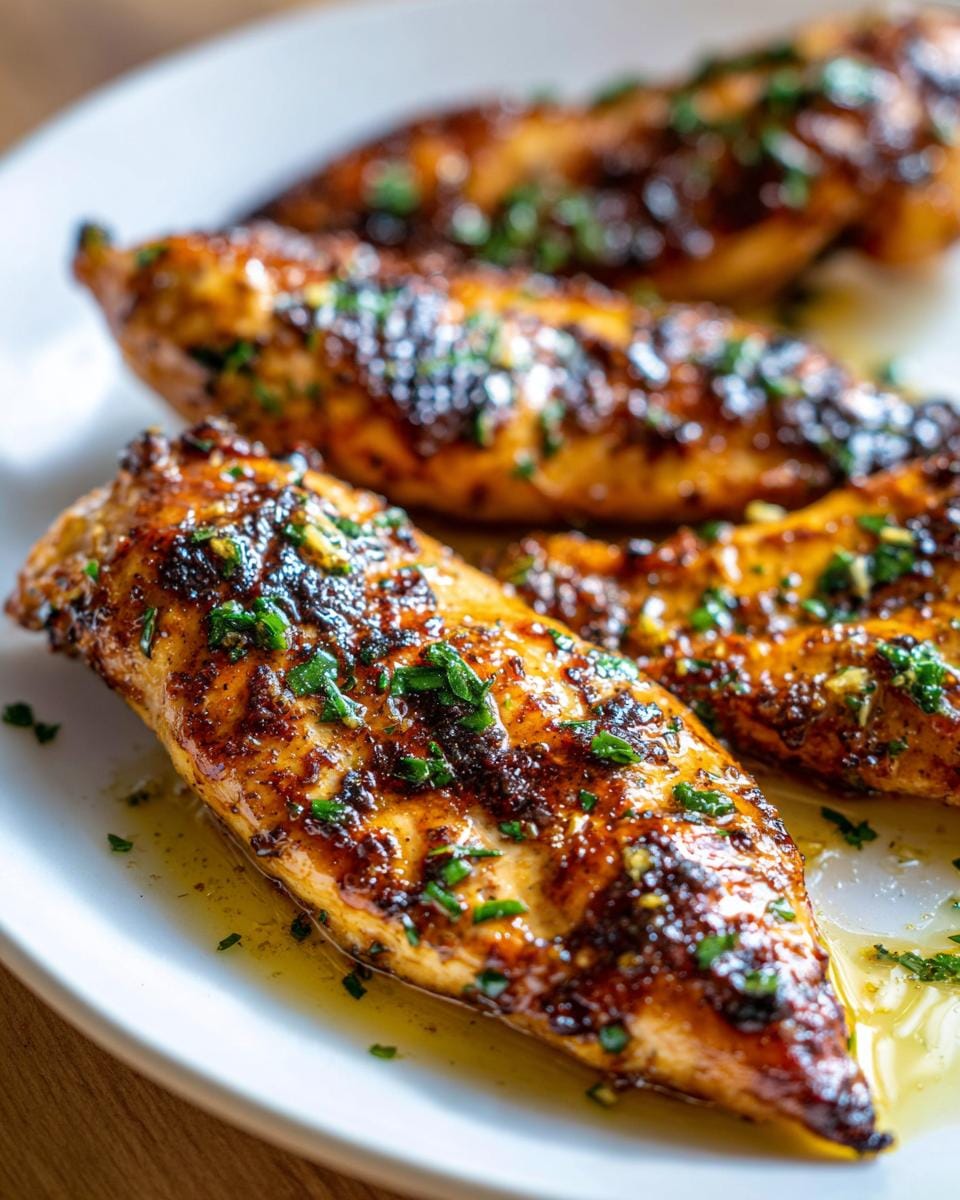
Step 8: Once they’re cooked through, remove the chicken from the griddle. Let them rest on a plate or cutting board for about 5 minutes. This is crucial for keeping them super juicy! While they’re resting, drizzle that fresh lemon juice over them and sprinkle with chopped parsley for a pop of freshness. Now they’re ready to slice and serve!

Serving Suggestions for Your Blackstone Chicken Breasts
This chicken is so versatile, it really pairs with almost anything! Here are a few of my favorite things to serve alongside it that just make the whole meal sing.
Creamy Macaroni Salad: Because who doesn’t love mac salad? A good, creamy version adds a comforting, classic vibe that’s always a hit. My recipe for creamy macaroni salad with crunchy veggies adds just the right texture contrast.
Broccoli Apple Salad: For something a little lighter and brighter, this salad is fantastic. The crunch from the broccoli and the sweetness from the apple and raisins are just perfect. Try my broccoli apple salad – it’s a refreshing twist!
Watermelon Peach Salad: If it’s summer and you want something super refreshing, this salad is IT. The sweet fruit and fresh mint cut through the richness of the chicken beautifully. This watermelon peach salad with mint and feta is a total game-changer.
Storing and Reheating Your Blackstone Chicken Breasts
Okay, so you’ve made these amazing Blackstone chicken breasts and now you’ve got leftovers – lucky you! The best way to store them is in an airtight container in the fridge. They’ll stay delicious for about 3 to 4 days. If you’re planning for lunches or dinners later in the week, this recipe is totally meal-prep friendly. Just let the chicken cool down completely before you seal it up tight. Trust me, reheating is where the magic happens to keep them just as good as when they were fresh off the griddle!
When it’s time to reheat, skip the microwave if you can. Your best bet is to pop them back onto a preheated Blackstone or into a hot oven (around 375°F) for about 5-7 minutes. This helps them regain that awesome slightly crispy edge and keeps them from getting rubbery. If you’re really pressed for time, the microwave can work on a lower power setting, just keep an eye on them so they don’t dry out!
Frequently Asked Questions About Blackstone Chicken Breasts
Can I use chicken thighs instead of breasts?
Absolutely! Chicken thighs are even more forgiving and tend to stay super moist. You might need to cook them a little longer, about 7-8 minutes per side, until they reach that 165°F internal temperature. They’ll get deliciously tender and flavorful on the Blackstone. If you’re looking for another thigh recipe, check out my Baked Boneless Chicken Thighs – they’re a family favorite!
What temperature should the griddle be?
I like to go for medium-high heat for these Blackstone chicken breasts. You want it hot enough to get that fantastic sear and crispy edges quickly, but not so hot that it burns the outside before the inside is cooked. Around 375-400°F (190-205°C) is usually the sweet spot on my griddle. It cooks them fast while getting that golden crust!
Can I prep the chicken ahead of time?
Yes, you totally can! You can season the chicken breasts up to a day in advance and keep them covered in the fridge. Just make sure they’re patted dry again right before they hit the hot griddle if any moisture has accumulated. This makes weeknight dinners even easier! This chicken is also great sliced up for salads, like in my Chicken Avocado Bowl.
Before You Go
I really hope you give these Blackstone chicken breasts a try soon! They’re honestly a game-changer for weeknight dinners. Let me know in the comments how they turn out for you – I’d love to hear about your experience! You can also connect with us on Facebook or reach out through our contact page if you have any questions or just want to share foodie fun.
Blackstone Chicken Breasts
Ingredients
Equipment
Method
- Preheat the Blackstone griddle to medium-high heat.
- Pat chicken breasts dry with paper towels for better searing.
- Pound thicker chicken breasts lightly to an even thickness for even cooking.
- In a bowl, coat chicken breasts with olive oil.
- Season both sides with salt, black pepper, garlic powder, onion powder, smoked paprika, and Italian seasoning.
- Place chicken breasts onto the hot griddle.
- Cook for 5 to 6 minutes without moving until a deep golden crust forms.
- Flip chicken breasts and cook another 5 to 6 minutes until fully cooked and the internal temperature reaches 165°F.
- Add butter to the griddle during the final minute and spoon melted butter over the chicken.
- Remove chicken from the griddle and drizzle with lemon juice.
- Garnish with chopped parsley and serve hot.